How many ways can you operate when activating a park for the Parks On The Air (POTA) program? I count 4 ways; I have tried them all but one is my favorite.
#1 When I read the accounts of other activators on social media I conclude the most popular way is to operate from inside a vehicle, what I call a “Shack-In-a-Truck”. It’s convenient, self-contained and rapidly-deployable. I operate this way in winter when the ground is frozen hard, the snow lays deep and crisp and even and it’s too darn cold to get outside.
#2 The second most popular way may be to operate in close proximity to the activator’s vehicle. I have done this too. It is often an advantage to operate this way when there isn’t enough nearby real estate to set up a station. The vehicle itself can be used to support an antenna – usually some kind of vertical mounted on a truck hitch or a magnetic mount on the roof.
#3 A third way is to pack up your station and backpack it to a picnic table somewhere in the park – perhaps in a covered shelter – then assemble the radio, tuner, battery, microphone or Morse key, and an adjacent antenna. A picnic table provides a dry, comfortable working space, a seat and lots of room to spread out your equipment.
#4 And then there is my favorite way (and probably the least popular among other POTA activators). I like to get far away from the madding crowd, deep into the bush where there are no picnic tables or other creature comforts. A quiet zone at peace with nature. This fourth way to operate involves some physical fitness and acquiring that fitness is a bonus. But, it doesn’t work well for operators who don’t have a lot of time or who are trying to achieve multiple activations in a single day (“roving”).
When POTA started becoming a semi-competitive activity I was excited and eager to take on the challenge. But my youthful brain sits inside an aging body that imposes physical limitations that I have to accept. So, here is what I decided to do. I could lay down a tarp and spread my gear out on the ground. I didn’t like that idea very much; it is not a very ergonomic solution, so I came up with a cunning plan.
I thought to myself: “how about assembling my complete station inside a frame that doesn’t require any kind of table. Just set it down on the ground, park my posterior on a lightweight, folding camping stool and go at it?” And that is what I built.
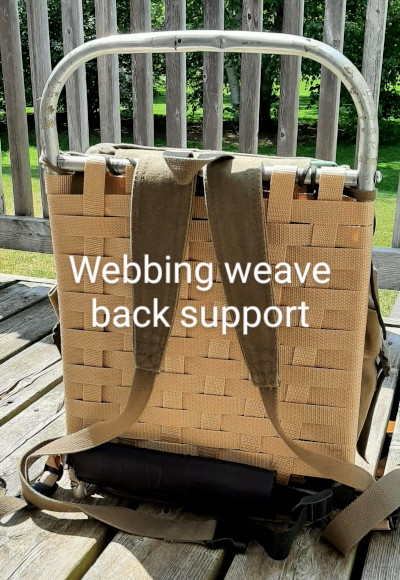
My portable wireless set (I like that term “wireless” – I have an affection for the old days of tubes, battery A and battery B and all that goes with it) sits inside a NATO rucksack made of sturdy canvas. I have an old aluminum backpack frame with which to carry the rucksack. I purchased a big reel of 1-inch webbing from Amazon and wove a back support around the frame to make it comfortable to carry.
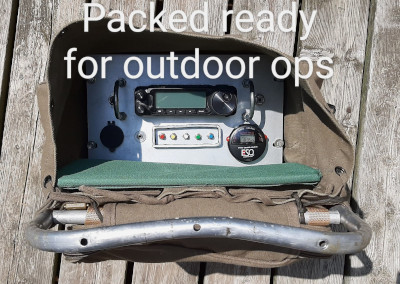
Inside the wireless set is:
- Yaesu FT-891 transceiver – 100 watts but operated at low power
- LDG Z-11 autotuner (the original low power version)
- Bioenno 12AH LiFePO4 battery
- Home made clone of Yaesu FH-2 remote keypad
- Powerwerx voltage meter with USB-PD outlet
- Fuse, battery disconnect switch
- Home made 12V DC powerpole distribution block
- Front panel key and antenna jacks
- UTC clock
I also carry a knee board on which to place my CW paddles and my Rite-in-the-Rain logbook. Yes, I know, it’s the 21st Century and I still log with pencil and paper. Works better than a tiny mobile phone touch screen keyboard for my fat fingers.
Does it work?
Yes, in fact I am very pleased with it. The set can be operated from a picnic table if one is available but it can also be used free-standing on the ground out in the backcountry with the front panel facing up. All the controls and the antenna, key, and headphone jacks are on the front panel. The height is perfect for when I am sitting on my folding camping stool.
There is one minor limitation involving the autotuner. The old LDG Z-11 will only initiate tuning if the SWR exceeds 3:1 and that cannot be changed – unlike on newer models. This means I operate it mainly in semi-automatic mode whereby tuning is initiated by pressing a button. But that button is only accessible by reaching down the side of the set. Perhaps I will open up the Z-11, break out my soldering iron and move that button up to the front panel of the set one day.
It looks heavy. How much does it weigh?
Yes, it’s a little on the heavy side (I confess, I haven’t actually weighed it) but it is perfectly manageable for short hikes. For longer hikes, or more difficult terrain (oh yes; we have a lot of difficult terrain on Ontario’s Bruce Peninsula) I have “the mule” – a home made, one-wheel cart that I have written about previously – to haul my gear over deep cracks in the exposed bedrock, across creeks and up and down tricky slopes.
The following pictures show my portable wireless set in all its well-worn, trail-beaten glory. The frame is made from 1-inch by 1/4-inch thick lightweight plastic. The front and rear panels are sturdy aluminum sheet. You just can’t buy this kind of gear, you have to have a basic workshop and the skills and willingness to make it yourself. Fortunately, building my own gear is all part of the fun of this great hobby that I enjoy so much.


Discover more from Ham Radio Outside the Box
Subscribe to get the latest posts sent to your email.

Glad I’m not the only one who likes to operate away from crowds. The radio pack is well executed and looks handy.
I saw your tarp shelter on your homepage but haven’t found the article yet. Where is it?
Enjoying the site; I’ll continue to poke around.
72 de Don, WB0ISG.com
LikeLike
Thanks Don. I’ll be posting a tarp shelter article soon. I have been experimenting with some new techniques and have come up with two new designs that are super fast to deploy. A 4×8 tarp, some paracord and 1 or 2 trees. No knots have to be tied in the field for either design. I’m off on a POTA road trip this week so watch out for it maybe the week after.
LikeLike