I have been very pleased with my DIY clone of a Wolf River coil. It has served me well on multiple POTA activations for the last few months. But, there is always room for improvement! And, besides, hams love to tinker with their equipment to make it just that little bit better.
The coil is used as a center load for a shortened vertical antenna for 40m and up. It has an adjustable shorting link for band selection. Below the coil is a 30×1.25 inch diameter aluminum tube conductor. Above the coil is a 9ft Buddipole telescopic whip.
The adjustable shorting link in the original design was a velcro strap holding a spring-loaded nut and bolt to which was attached the shorting link to the bottom of the coil. The velcro strap slides up and down the coil to find the resonant point for each band.
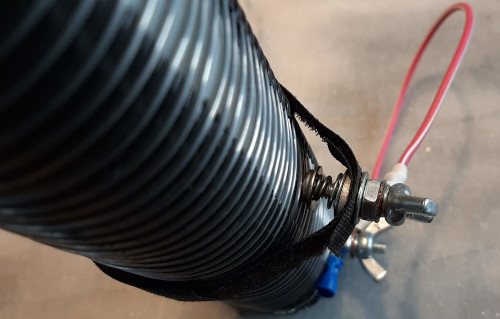
This arrangement worked but had two small problems. First, the spring-loaded nut and bolt was secured through a hole in the velcro strap but was not held rigidly enough. Every time I deployed the coil I had to re-adjust the nut and bolt to ensure it was perpendicular to the coil and securely making contact with the stainless steel winding. Second, sliding the velcro strap up and down the coil required two hands. One hand to ease the tension on the spring-loaded nut and bolt and a second hand to grip the velcro strap behind the coil and slide it up and down.

I could see two possible routes to overcoming these issues. I could have replaced the spring-loaded nut and bolt with a clip to attach to the coil turns, or make a rigid sliding collar. I chose the latter. I had a section of PVC plumbing pipe that was just large enough to fit over the coil so I carefully cut a piece one inch wide and drilled a hole for the spring-loaded nut and bolt.
Now a new problem presented itself. The PVC collar would not fit over the coil with the nut and bolt attached. So I cut a very small gap in the collar opposite the nut and bolt; enough to stretch the collar over the coil. That worked fine business, but the collar was now a little too loose to maintain contact between the tap and the coil winding. So, the velcro strap was retained and fastened around the perimeter of the PVC collar to secure it.
Now the new, improved collar slides up and down the coil smoothly, guided by just one hand. As an added bonus, the PVC collar keeps the nut and bolt perpendicular to the coil at all times. A good and successful modification; but what’s next? Well, the coil is a little too heavy so I am thinking about a rebuild based on the same general design. I’ll post the details when that is complete.
Discover more from Ham Radio Outside the Box
Subscribe to get the latest posts sent to your email.
