My portable operating station – which I use principally for POTA activations – is constructed in the form of a manpack inside a very rugged cotton canvas NATO-style rucksack. Nearly everything is hooked up, ready to go. I don’t need to find a picnic table, the manpack has an internal frame just high enough to bring all the radio’s controls to a comfortable height for operating while I am seated on a compact camping stool.
Arrival Onsite to CQ in About a Minute
A whip antenna can even be mounted directly on the manpack for ultimate convenience. On arrival at an operating site, the manpack can be set down, the whip attached and a set of radials spread out on the ground. I am then ready to flick the power switch to connect the radio to the battery (at the bottom of the pack) and start operating. Setup time – about a minute!

The disadvantage of this arrangement ìs that the manpack is bulky and a little heavier than I am comfortable with hauling into a park on my back. The NATO-style rucksack is not designed for comfort; there is no padding, no chest strap and an inadequate waist strap.
As I have written in previous posts, rapid deployment is the number one priority for my POTA activations. Any other issues can be worked around. My workaround for an uncomfortable manpack is wheels!
Three Wheels On My Wagon
There are many commercially available carts that could serve as a radio cart. Modern baby strollers caught my eye. Good ones have three spoked wheels. The front wheel swivels to allow “zero-turns”. But I couldn’t find a used one for a reasonable price so the decision to build my own was made.
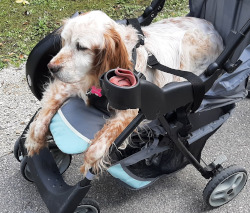
Just over a year ago, our aging dog was finding it difficult to walk. We bought a very cheap, used stroller for her and modified it so she could ride in it and still enjoy her trips outdoors. Sadly she is now a silent key (we were convinced that she could understand Morse Code – I will write about why we believed that in a later post).
Our dog stroller was just not suitable for my radio needs and it was too old to put a child in it safely, so I dismantled it for parts. I also had an old golf hand cart that I dismantled for parts. With this pile of wheels, metal tubes and some other bits and pieces from my scrap metal collection, I built my first radio cart.
Two Wheels On My Wagon
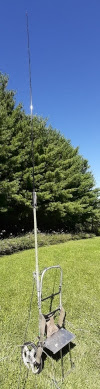
That first cart had two wheels. It worked really well for transporting the manpack across parking lots and along nice, groomed trails. It could even be used as a support for a vertical antenna. It served me well for multiple POTA activations. There was a problem when it came to rougher trails though. My home is an an area that is very rocky, with lots of trees. Trails often cross areas with many rocks breaking unevenly through the trail surface. Tree roots protrude up from the ground. Along several local trails there are large, wide, deep cracks in the underlying rock. Cracks big enough to swallow a cart and a ham radio operator.
Attempting to pull a two-wheeled cart along a rough trail and over large cracks will be very difficult, if not impossible. It will certainly result in severe mechanical stress on the cart and its payload. So another design was needed. This time a similar frame was needed, but with only one wheel. And that wheel had to be big enough to roll over most of the obstacles it would encounter on a rough and rocky hill country trail.
I climbed in my truck and set off to find a suitable wheel. By luck, my first stop was at a local Thrift Store where I found a child’s bicycle for a bargain price. All I needed was the two wheels. One for the cart and the second one for a spare. A little bit of basic engineering with simple tools yielded just what I needed.
One Wheel On My Wagon
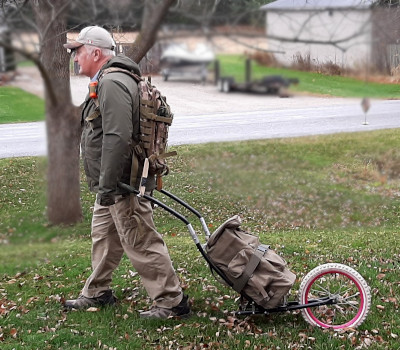
Cart number 2; my unicycle cart, cannot stand upright on its own unlike the first, two-wheeled, cart. That means it cannot be used as an antenna support. It lacks balance (a little like its owner!) but it can negotiate almost any terrain with my manpack strapped to it. It has two snap-on handles that I hold to provide the balance. To reduce the effort required to pull it along I wear a backpack with extra straps clipped to the cart. The backpack with its shoulder, chest and waist straps provides a perfect, stable and comfortable harness. It is also a convenient place to carry my camping stool, water bottles, a tarp and a small device that makes a very loud noise intended to deter bears from approaching.
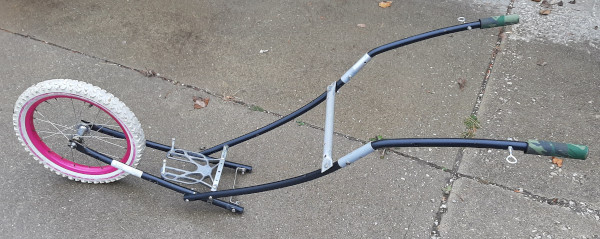
The one-wheel cart was by far the most complicated to design and build. My first attempt was top heavy and very difficult to balance. I had over-simplified the design for ease of construction and needed to re-think the basic physics of balancing a heavy pack on a single wheel. After studying the design of other one-wheel carts I realized that the centre-of-gravity of the pack must be as low as possible relative to the wheel. Version 2 was a much more complicated build but is stable and easy to use. You can see from the picture how the frame is shaped to keep the radio manpack payload close to the ground.
No Wheels On My Wagon
Now, I’m not rolling along. Instead, I am sliding – through snow. Living in Southern Ontario means adapting to our four seasons: Late Winter, Summer, Early Winter and Mid-Winter. It always snows here, every year, without fail. We can usually expect a good covering of snow from late November until April. That’s five months of having to either hibernate or adapt. I chose to adapt by building a radio sled.
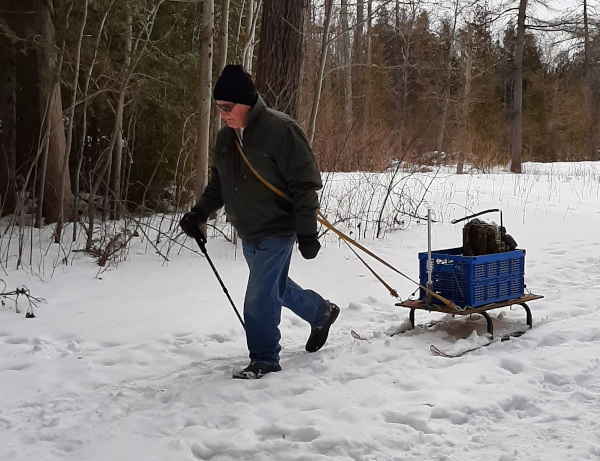
My sled is based on the Smitty sled used by ice-fishing enthusiasts for getting their supplies out to their huts on our frozen lakes. I built my own. I bought a pair of childrens’ downhill skis from a charity shop and cut down some steel folding table legs to support a plywood platform. An antenna mount is screwed to the platform. This simple arrangement allows me to get out and play radio mid-winter.
So I’m ready to roll (or slide) in any terrain or weather. I had fun making these carts/sleds and my chief financial officer (She-Who-Must-Be-Obeyed) is happy that I didn’t spend more than twenty bucks (-ish) for all of them!
Discover more from Ham Radio Outside the Box
Subscribe to get the latest posts sent to your email.
