The biggest disadvantage to using a Yaesu FT-891 transceiver for field operations may be that its small form factor means most features have to be accessed from the menu system. Fortunately, some of the most used features can be easily assigned to the front panel “A”, “B” and “C” keys. That’s great, but in the field I like to make use of the CW message memories to send repetitive messages, like calling CQ. Lazy? Well consider this; oftentimes a portable operator is working in uncomfortable conditions. Logbook balanced on one knee, CW key on the other knee, mosquitoes attacking from all sides. You get the picture.
So now, how can a portable op like myself make best use of the ABC keys to store commonly used features (like the FT-891’s splendid IF filter options) and still have access to the memory keyer? I need at least eight “ABC” keys! Yaesu has a solution, but it’s quite expensive. Yaesu’s solution is a Remote Control Keypad called the FH-2. The FH-2 plugs into the REM/ALC jack on the back of the radio and provides one touch access to the five CW (or voice) memories plus other features.
On the principle that I never buy anything I can build myself, I decided to look for a DIY clone solution. I found several references to the schematic and component values. A former fellow club member, when I was a member of the York Region Amateur Radio Club, John Leonardelli VE3IPS has an excellent post on his blog detailing his build. John gave the full schematic but his own build was a simplified device that activated just one message memory. That was all John needed. I decided instead to build a FH-2 clone to activate all five of the FT-891’s message memories.
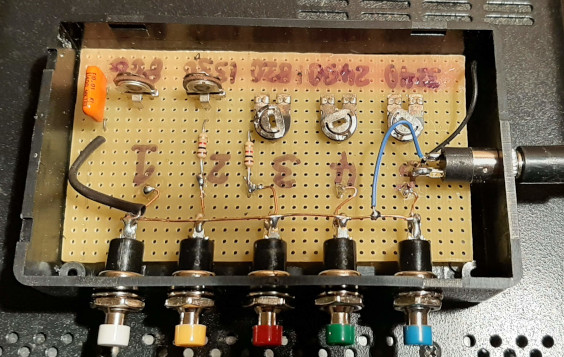
Each message memory is activated by connecting the tip of the REM/ALC plug to ground through a resistor. Each message memory is activated by a distinct value of resistor. The values are: (1) 866R, (2) 1K330, (3) 1K820, (4) 2K490 and (5) 3K240. I have employed the common practice of using an “R” to represent ohms and a “K” to represent the decimal point in a kilohm value.
These numbers are not standard resistor values. They can be made up with resistors connected in series but my own collection of resistors are not high tolerance so I would have to measure them individually. I did have a box full of variable resistors so I pulled out three 1 kilohm and two 5 kilohm miniature PCB mountable variable resistors. I still needed to add series 1 kilohm fixed resistors for message memories 2 and 3, but then it was a simple matter of adjusting the variable resistors to get the values I needed. Incidentally, even if the values are not exact, the device still works anyway. In addition to the resistors, a 0.01 microfarad RF shunt capacitor is installed across the device output.
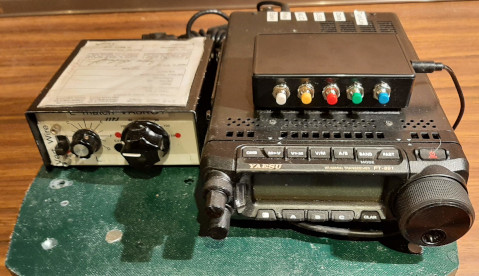
My FH-2 clone was built on a piece of perfboard inside a small plastic project box. Small coloured pushbuttons are used to activate each of the five message memories. The total build time was about an hour. The device mounts on top of my radio with velcro type fasteners. Now I am able to assign the radio’s ABC keys to my most used CW filter features while also having one touch access to all five message memories.
Discover more from Ham Radio Outside the Box
Subscribe to get the latest posts sent to your email.

2 thoughts on “A DIY Clone of the Yaesu FH-2 Remote Control Keypad”