There are several reasons for building our own ham radio projects instead of buying commercial products. First, the satisfaction of making contacts using hardware you have built yourself. Second, it usually costs far less to build it yourself. The restrictions, lockdowns and supply chain shortages we have experienced recently sometimes also make it a necessity to build it yourself.
My latest build project has been a loading coil for my field portable vertical antenna. The first loading coil I built used a coil of insulated wire with fixed taps. It was compact and very lightweight but, without a tap on every turn it was difficult to get an exact match on every band every time.
A Bare Wire Coil with a Movable Tap
The solution is a coil wound with un-insulated bare wire with a movable tap that can be placed on any individual turn. That creates two new problems. First, the coil turns have to be spaced apart so that adjacent turns do not touch each other, and so that individual turns can be tapped. This makes the coil quite a bit larger and consequently heavier too. It is also difficult to evenly space the coil turns so some kind of separator must be arranged.

Next, it was necessary to devise a way to connect a tap. A shorting wire runs from one end of the coil to the tap and could be terminated in an alligator clip to attach it to the point on the coil where a tap is needed. That approach is often used by hams, but alligator clips that are small enough to attach to the coil turns are notoriously unreliable and subject to failure.
A Sliding Tap Collar
I wanted to have a sliding connector that could be moved up and down the coil to make the tap. Commercial products like the popular Wolf River coils use a sliding collar with a contact that floats over the coil windings. I had to find a way of replicating that in a simple but reliable way.
The Cunning Solution
First, I searched the hardware stores in vain for some means of spacing the coil turns. Then a solution presented itself. The old vacuum hose I found in the garage might do the trick. It was made of black plastic with ribs about an eight of an inch apart. The hose was wrapped around the coil former and trimmed so there would be a gap where the sliding tap would make contact with the coil.
A new challenge emerged as I started to wind the coil. The vacuum hose twisted and stretched as the wire was tightly coiled around it. It took a couple of attempts to get it right.
Thinking Chair
Now, how to solve the floating collar challenge? Several sessions sitting in my leather reclining thinking chair, staring at the inside of my eyelids were required. Then a light bulb moment. A Velcro strap! A hole was punched in the middle of the strap and a small nut and bolt with washers and a small spring were inserted through the hole.
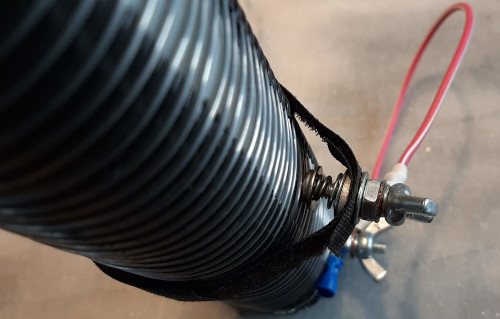
The head of the bolt makes contact with the coil at the tap point. The velcro strap is fastened tightly around the coil but the tension can be released by gently lifting the butterfly nut at the shorting wire connection end of the bolt. The strap can then easily be moved up and down the coil as required.
Conclusion
The end result is a very useful loading coil that let’s me tune 20-metres, 30-metres and 40-metres with ease. It is bulkier, heavier and physically larger than the previous coil with fixed taps but this is the coil that is going to be used on my field trips this year.
Discover more from Ham Radio Outside the Box
Subscribe to get the latest posts sent to your email.
