I think it was a couple of years ago now I ordered a QRP Labs QMX transceiver. It quickly, but temporarily, became my favorite radio for portable field operations. I have written before about why I believe the QMX is a mighty fine piece of miniaturized technology but is less suitable for the rigors of being operated in the kind of field operating environment to which I expose my radios. My QMX is the low-band version and I also miss the opportunity to explore the higher bands when propagation conditions permit.
What’s a poor Ham to do?
I could buy another QMX, but order the high band version this time. It would be a very modest investment, but would still require ruggedizing. Another downside is the long, long wait time betwixt ordering and receiving the tiny parcel from Turkey. I could also order a QMX+ which is a fine all HF band radio, but then what to do with the QMX low band? There is another solution.
The Paranoid Android
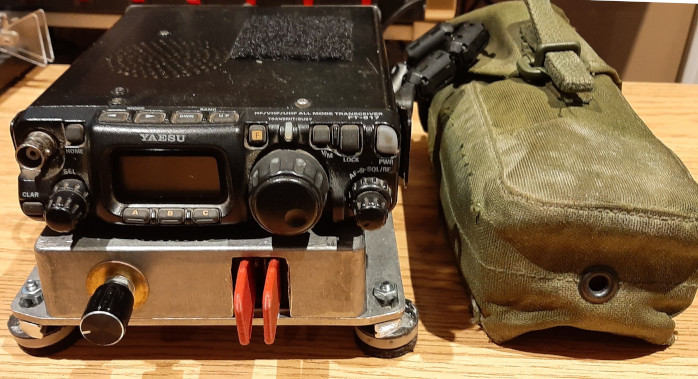
I recall a quote from the book “The Hitchhikers Guide to the Galaxy” by Douglas Adams in which the perenially depressed robot “Marvin the Paranoid Android” moans: “The first ten million years were the worst.” When I look at the front panel of my ancient Yaesu FT-817 non-ND version it kinda has a Marvin look about it. It has spent almost a quarter of a century waiting patiently in a drawer for the day when it might be called into action again. Many radios have come and gone during that time but – even though I had planned to sell it on many occasions – I still own it and it’s day to see the sunshine again has finally come.
Where are the features?
The non-ND version of the FT-817 is a barebones rig. I needed a CW memory keyer – it doesn’t have one. Activating a POTA park sometimes requires great patience and many, many CQs. My QMX at least has that covered. I also needed an audio filter. It used to be possible to buy a Collins mechanical filter but they are no longer made. My QMX also has that feature covered, but the FT-817 requires an external audio filter.
Failure is not an option
The FT-817 does have a higher level of ruggedness than the QMX. With a few extra precautionary measures it can be protected from the ingress of sand particles during a beach activation, or unexpected spray from waves on the shores of the Great Lakes. The QMX will not tolerate wide variations in DC supply voltage; the FT-817 has that covered. The QMX uses inexpensive but fragile PA transistors (mine have not succumbed to failure – yet). Well, the FT-817 also had fragile PA transistors in its early days and mine did indeed fail during a field deployment. The FT-817’s PA board is a small module that is easily replaced with the new upgraded module – as was mine.
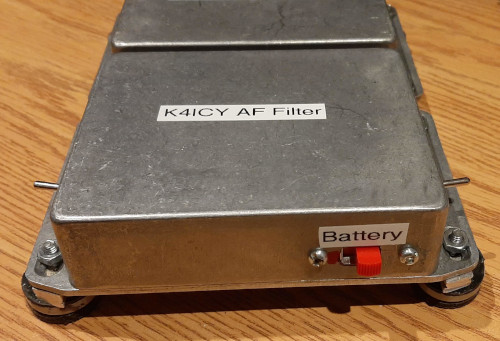
9-volt battery (now replaced by a buck converter) which supplies both modules.

I get by with a little help from my friends
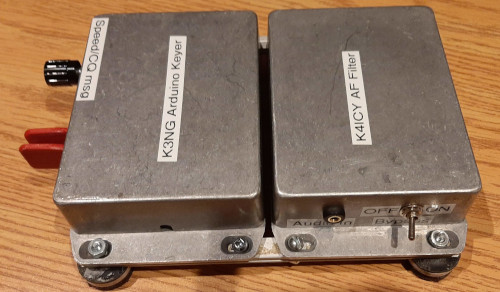
The feature shortcomings of the FT-817 have been overcome with two “helper modules” assembled inside aluminum Hammond project enclosures. The front enclosure contains a K3NG Arduino nano based CW keyer and a very simple no-thrills set of 3D printed paddles. Well who really needs to spend $300 on a fancy set of paddles for a brief POTA exchange? These paddles get the job done FB. The same cannot be said about the fist that operates them!
The front panel controls are very simple. The paddles protrude through a cutout in the Hammond enclosure.
Beside the paddles is a knob. This knob is used to operate a rotary encoder inside. Clicking the knob operates the switch built into the rotary encoder and triggers the sending of a “CQ CQ POTA de VA3KOT VA3KOT k” stored message in the Arduino keyer.
Rotating the knob adjusts the speed of the CW over a wide range. I have found this to be a very useful feature. I usually send at 20wpm and receive responses that are slower and faster than my sending speed. With this prominent control front-and-center I can quickly adjust my sending speed to suit.
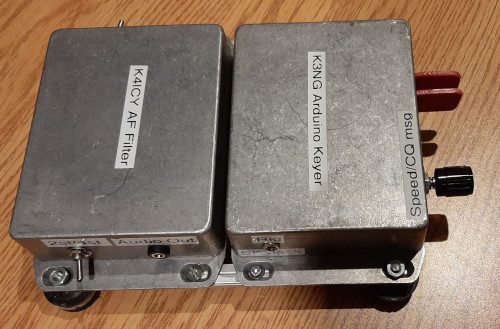
I built the K4ICY audio frequency filter module around a quad op-amp DIL chip. This is a very simple circuit that provides 2 or 4 stages of filtering to narrow the bandwidth of a received signal. Each stage contains identical components whose values are selected according the operator’s desired sidetone frequency. The whole module can be bypassed if required allowing an audio bandwidth wide enough to pass a crosstown bus sideways.
Both modules are rigidly secured to each other using two aluminum rails made from scrap material. I hoard scraps of metal, plastic and other materials – you just never know when you’re gonna need ’em.
The dimensions of the two modules provide an ample flat surface on which to mount the ancient, but revered, transceiver. I purchased some “peel & stick” Gorilla brand “Slipstick” gripper pads and applied four of them to the base of the FT-817. This is a genuinely useful product I recommend to any hambrewer. The radio has been secured to the top of the helper modules with two woodland zip ties made from thin cordage. These simple cord fasteners work just as well as plastic zip ties and can be easily undone for servicing the modules.
I purchased a box load of these Hammond enclosures at an auction many years ago. They have proved very useful. In another build, using the same enclosures configured in an identical manner, I was able to construct two battery modules each containing four 18650 Lithium Ion batteries in 4S1P configuration for powering another one of my ancient QRP transceivers.
This is not the first time I have revived my FT-817, but previous rebuilds were clumsy. It is one thing to put together multiple modules on the shack bench. Clumsy, cluttered, loose modules might work in a picnic-tables-on-the-air type activation. But would it work in a situation where there are no convenient surfaces to mount the equipment; where – at any moment – we might be politely asked to vacate the area by a hungry bear looking for a space to eat his lunch? This new build is a grab-and-go package that works in small, tight spaces – even on top of a rock in the backcountry – and that’s the kind of environment where I like to operate.

Help support HamRadioOutsidetheBox
No “tip-jar”, “buy me a coffee”, Patreon, or Amazon links here. I enjoy my hobby and I enjoy writing about it. If you would like to support this blog please follow/subscribe using the link at the bottom of my home page, or like, comment (links at the bottom of each post), repost or share links to my posts on social media. If you would like to email me directly you will find my email address on my QRZ.com page. Thank you!
The following copyright notice applies to all content on this blog.

This work is licensed under a Creative Commons Attribution-NonCommercial-NoDerivatives 4.0 International License.
Discover more from Ham Radio Outside the Box
Subscribe to get the latest posts sent to your email.

Very nice! I need to use my old (non-ND) FT-817 more often.
LikeLiked by 1 person
hi John, thanks for a great article! I’ve been meaning to send you a fan letter, always interesting and informative reads. I also have an ancient ft-817 bought new in 2001, it’s so early it predates lot 45!
Thanks again and looking forward to your next article. Vy73, Rick VE1RNM
LikeLike
@hamradiooutsidethebox.ca Thanks for the informative post! If still publishing as a blog, please consider adding it to blogs.radio for access to more techie readers. #HamRadio
LikeLiked by 1 person
Remote Reply
Original Comment URL
Your Profile
Why do I need to enter my profile?
This site is part of the ⁂ open social web, a network of interconnected social platforms (like Mastodon, Pixelfed, Friendica, and others). Unlike centralized social media, your account lives on a platform of your choice, and you can interact with people across different platforms.
By entering your profile, we can send you to your account where you can complete this action.
Gary, good idea. I went to blogs.radio but couldn’t figure out how to add my blog. Can you help?
LikeLike
when I first got the new FT-817 I became a member of the blown finals club
I finally decided to get the 818 and it goes where the 705 does not
I have owned 7 of these radios and only the original purchase went FBC
I have seen these radios for $300
john ve3ips
LikeLike
John, interesting comment about the 818 vs 705.
LikeLike